
You press the power button, wait for the usual whirr, and get nothing. No lights. No fan noise. Maybe the screen stays black while your stomach drops a bit. If your computer won’t turn on, that doesn’t automatically mean the machine is finished.
Most of the time, the fault is simpler than people think. In Australian desktop repair data, power supply unit failures account for about 35% of “won’t turn on” incidents, and another 28% come from faulty power cables or wall outlet issues according to the Australian Computer Society’s diagnostics report covering over 12,000 repair cases across Melbourne and Sydney. That means a large share of these jobs start with power delivery, not exotic internal faults.
For home users in South East Melbourne, especially in older Bayside homes, the smart approach is basic, methodical, and safe. Start outside the computer. Check what feeds it power. Then look for signs of life. Only after that should you consider opening anything up.
Table of Contents
- First Things First Don’t Panic
- Check Your Power Source Before You Check Anything Else
- Troubleshooting Laptop-Specific Power Problems
- Interpreting Your Computer’s Signs of Life
- The Safest Internal Checks You Can Perform
- When to Stop and Call Computer Daddy in Melbourne
First Things First Don’t Panic
If you’re annoyed, stressed, or worried about losing files, that’s normal. A dead computer feels urgent because it cuts off work, study, banking, family photos, everything at once. The good news is that many no-power problems still have a straightforward fix.
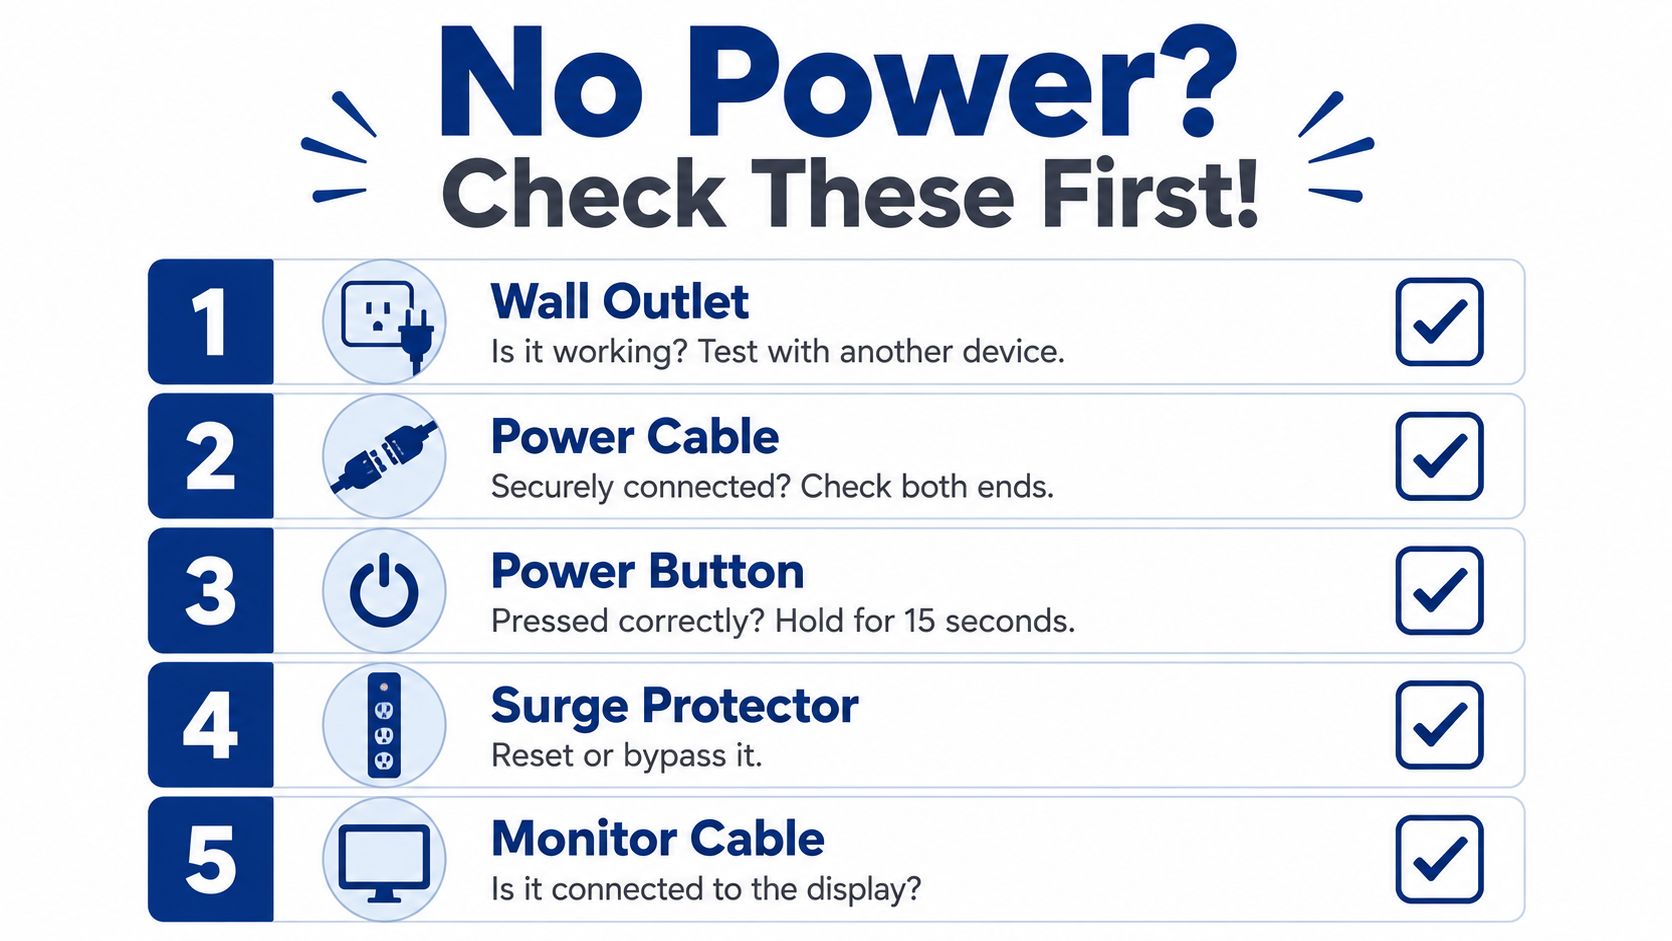
Start with the least risky checks first. Confirm the wall outlet works. Confirm the cable is seated properly. Confirm any power board or surge protector isn’t the problem. Those steps sound almost too basic, but they solve a lot more jobs than people expect.
Practical rule: Never assume the computer itself is faulty until you’ve ruled out the power path feeding it.
In the Australian region, desktop diagnostics show nearly two-thirds of “computer won’t turn on” cases stem from electrical power delivery breakdowns rather than internal component failure when you combine PSU faults and external power faults in the ACS data. That makes external checks the smartest starting point for home users.
Keep your testing calm and simple. Change one thing at a time. If a step doesn’t help, move to the next one without pulling the machine apart in frustration. That approach avoids wasted money and accidental damage.
Check Your Power Source Before You Check Anything Else
Older homes around Port Phillip, Kingston, and nearby Bayside suburbs often create a very convincing fake hardware fault. The computer appears dead, but the actual issue is a tired wall outlet, an overloaded surge protector, or a cable that has worked loose.
Regional IT diagnostics note an overlooked gap between perceived PSU failure and outdated outlets or power strips, especially in older South East Melbourne homes. The same write-up reports that 68% of Australian laptop power issues stem from external power faults rather than internal hardware failure in the cited regional diagnostics from 1300 Nerd Core’s power issue guide. Even when you’re dealing with a desktop, the lesson is the same. Check the external supply first.
Start at the wall
Do this in order:
- Test the wall outlet with another device. A lamp, phone charger, or kettle is fine. If that device doesn’t work either, stop blaming the computer.
- Bypass the power board. Plug the computer straight into the wall socket. Surge protectors and power strips fail without warning.
- Check both ends of the power cable. One end at the wall, the other at the desktop PSU or laptop charger brick. Push firmly. Don’t assume it’s seated because it looks close enough.
- Look for physical wear. Bent pins, fraying, scorch marks, or a loose fit in the socket all matter.
- Try a different cable if you have a matching one. For many desktop towers, the standard kettle-style power lead is easy to swap for testing.
A lot of people skip step one because they feel certain the outlet is fine. That’s where time gets wasted.
Desktop checks that get missed
Desktop towers have one extra trap. On the back of the power supply, many units have a small rocker switch marked I / O. If it’s set to O, the front power button won’t do anything. It sounds obvious until someone knocks it while vacuuming, moving the desk, or plugging in another cable.
Also check the monitor separately. If the tower has lights or fan movement but the screen stays black, the computer may be on. Make sure the monitor has power, the input source is correct, and the display cable is connected to the right port.
If the machine is completely lifeless, treat it like a power problem first. If it has lights, fan spin, or beeps, you’re dealing with a different type of fault.
Laptop power is a separate path
Laptops don’t have a desktop PSU switch, but they do have two common failure points: the AC adapter and the battery. If the charger brick has an indicator light, check whether it’s lit. If the laptop has a charge light near the port, note whether that light changes when you plug in the adapter.
If the charging plug feels loose in the port, don’t force it. A damaged charging port can turn a simple charger problem into a board-level repair.
Troubleshooting Laptop-Specific Power Problems
Portable machines fail differently from towers. A desktop usually depends on one main power supply. A laptop depends on the charger, the charging port, the battery, and the board that manages all of it.

Australian BCMA milestone data shows PSU-related no-power failures in homes dropped by 42% between 2010 and 2020 after energy efficiency standards were introduced in 2009. At the same time, the BCMA’s 2024 consumer technology report says laptop battery failures now represent 51% of Australian portable device power-on issues, with a median failure age of 3.2 years, compared with a global median of 4.5 years. That shift matters because many laptops that “won’t turn on” really have a battery or charging problem, not a dead motherboard.
Try a proper power cycle
A power cycle clears residual charge and can wake up a laptop that seems frozen or dead.
Use this sequence:
- Unplug the charger.
- Remove the battery if your model allows it. Many newer laptops don’t.
- Hold the power button down for about 15 to 20 seconds.
- Reconnect power only. Leave the battery out for the first test if it is removable.
- Try turning it on again.
This works because some machines get stuck in a low-level power state and need a full discharge before they respond normally.
If your charger has failed, this reset won’t fix that. It only rules out a locked-up power state.
Check the charger and charging port
Look closely at the adapter brick and cable. You’re checking for splits in the insulation, kinks near the connector, burn marks, or a plug tip that looks bent or loose. If the laptop charges only when you hold the plug at a certain angle, the charger or port needs attention.
A useful next step is comparing symptoms:
| Sign | More likely cause |
|---|---|
| No charge light at all | Charger, outlet, or charging port |
| Charge light appears but laptop stays dead | Battery, power management, or board fault |
| Turns on only with charger connected | Worn battery |
| Charger gets unusually hot or cuts in and out | Faulty adapter |
If you suspect the adapter, a practical follow-up is to check a more focused guide on what to do when a laptop charger isn’t working.
A laptop with a dead battery can still confuse people because it may show no response at all, even when plugged in, if the adapter isn’t delivering clean power.
Interpreting Your Computer’s Signs of Life
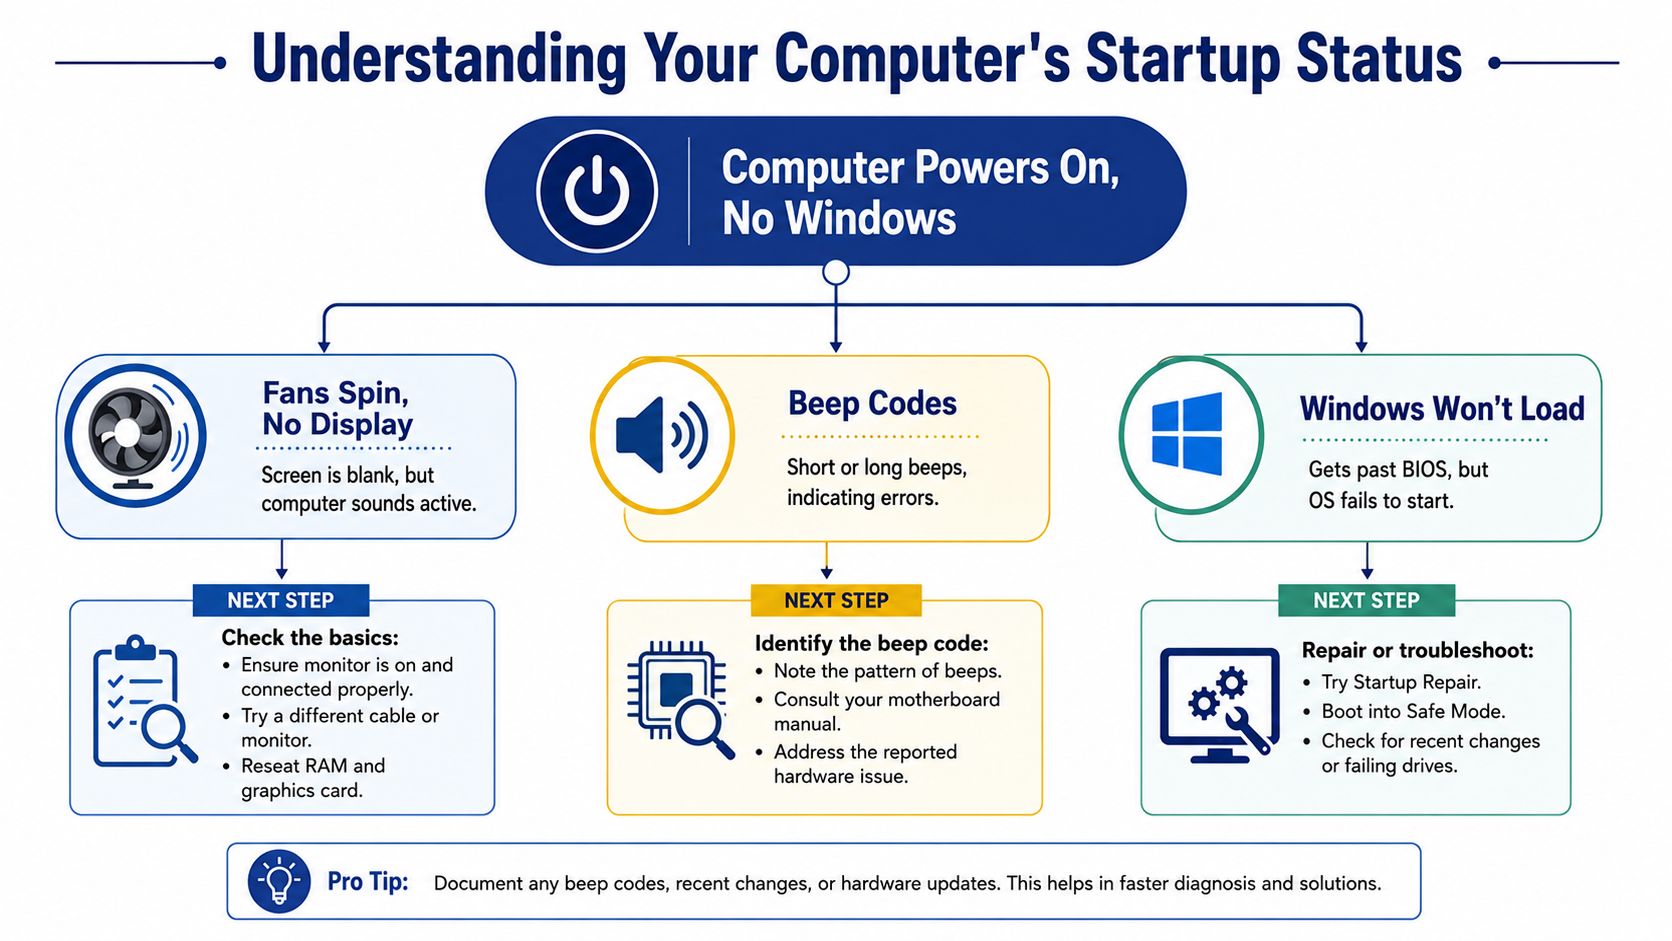
A computer that does something is often easier to diagnose than one that does nothing. Fan spin, keyboard lights, beeps, and motherboard LEDs all narrow the field.
Many home users frequently get stuck. Intel’s Australian gaming resource analysis found 72% of Australian PC users facing “no power” symptoms never check motherboard debug LEDs labelled CPU, DRAM, VGA, or boot according to the cited Intel AU video resource. Those tiny lights matter because they tell you which stage of startup has failed.
Fans spin but nothing on screen
If the fans spin and the case lights come on, the machine has power. That’s different from a true no-power fault. Focus on display and startup clues.
Check these items before touching internal parts:
- Monitor power and input. Make sure the screen itself is on and set to the right source.
- Display cable path. If the desktop has a separate graphics card, the monitor should usually be plugged into the graphics card output, not the motherboard video port.
- Listen for beeps. A pattern of beeps often means the board is failing a startup test.
- Watch keyboard lights. If Num Lock or Caps Lock responds, the system may be partially alive even with no picture.
A machine that reaches the Windows logo and then freezes is a different category again. That’s usually not “no power”. That’s a boot problem.
Beeps and debug lights in plain English
Many modern motherboards include four common debug labels:
| Light label | Usually points to |
|---|---|
| CPU | Processor or its power delivery |
| DRAM | Memory not seated, failed, or incompatible |
| VGA | Graphics card or display output issue |
| BOOT | Storage drive or operating system startup problem |
If one of those lights stays on, don’t treat the whole computer as dead. Treat that light as the clue. For example, a DRAM light often means a RAM stick isn’t seated correctly. A BOOT light means the machine may be powering on but can’t find Windows.
The computer is talking to you. Lights, beeps, and fan behaviour are its basic language.
If you hear beeps, look up the pattern in your motherboard or laptop manual if you still have it. Manufacturers don’t all use identical beep meanings, so guessing can send you in the wrong direction.
The Safest Internal Checks You Can Perform
Only open the machine if you’ve already ruled out the external power path and you’re comfortable working carefully. If not, stopping here is sensible.
For desktop systems that have POST beeps or fan spin but no display, there are two checks that give the best return with the lowest risk. AU service data cited by Nimble Nerds says reseating RAM and GPU components using a minimalist boot method yields a 67% success rate, and 41% of failures are linked to loose 24-pin or CPU power cables that degrade over time in humid coastal environments like Bayside, as noted in their desktop boot troubleshooting guide.
Reseat RAM the careful way
Shut the system down fully, switch off the PSU at the back if it has a rocker switch, and unplug the power lead. Press the front power button once after unplugging. That helps discharge leftover power.
Then:
- Open the side panel carefully. Don’t yank anything.
- Locate the RAM sticks. They’re the long modules beside the CPU area.
- Release the retaining clips.
- Remove one stick and reseat it firmly. Line up the notch correctly.
- Test with one stick only. If the board has multiple slots, try the slot recommended in the motherboard manual, often the second slot from the CPU.
This is a better method than pulling everything apart at once. One change. One test. Clear result.
Check the main power plugs
The two plugs that matter most inside a desktop are:
- 24-pin motherboard power connector
- CPU power connector near the processor area
Push gently but firmly to confirm they’re fully seated. Don’t force them at odd angles. A connector that’s just slightly loose can produce fan spin, no display, or random failure to start.
If your system has a graphics card and the monitor is connected to it, check the GPU power lead too. Then test again.
For more severe board-level faults, a service that handles motherboard repair for laptops and related hardware diagnostics is the safer path than continuing to poke around.
Know when to stop
Some jobs stop being suitable for DIY very quickly. Stop immediately if:
- You smell burning
- You see scorch marks or melted plastic
- A connector is stuck and won’t move cleanly
- The laptop case needs deeper disassembly
- You aren’t confident reassembling what you’ve opened
One successful repair habit separates careful techs from frustrated owners. Test one change at a time, then stop and observe.
When to Stop and Call Computer Daddy in Melbourne
There comes a point where more home troubleshooting stops being helpful and starts increasing the risk. If you’ve checked the outlet, cable, charger, monitor, and basic startup clues, and the computer won’t turn on or won’t complete startup, it’s usually smarter to hand it over.

South East Melbourne homes add a few practical complications. Older Bayside properties can have temperamental outlets and ageing wiring. Humid coastal conditions can contribute to corrosion and loose connections. For seniors, students, and busy families, the bigger issue is often time. Spending half a day second-guessing a dead PC is rarely the best use of it.
Red flags that end DIY troubleshooting
Call for help if any of these apply:
- Smoke, burning smell, or visible damage. That’s a safety issue, not a YouTube fix.
- Important files are on the machine. Family photos, tax records, business documents, or study work aren’t worth risking. If data matters, use a proper data recovery service rather than repeated DIY attempts.
- Laptop charging port feels damaged. Forcing a charger into a loose or cracked port can make a smaller repair much worse.
- The machine powers on intermittently. Intermittent faults often need hands-on testing with known-good parts.
- You’ve already tried the safe steps. Repeating the same checks won’t create a new outcome.
A local on-site technician is especially useful when the fault could involve the home environment, not just the computer. That includes dead wall sockets, overloaded power boards, weak Wi-Fi after a restart, or multiple devices suddenly acting oddly after a storm.
For a quick overview of practical troubleshooting, this video is worth watching before you book a visit.
What a repair visit usually costs
People often avoid calling because they assume the bill will be extreme. In Melbourne, the published pricing range for on-site computer repair gives a more grounded picture. Typical on-site hardware work runs from $100 to $160 per hour, with most standard repairs costing $100 to $350, while simple software fixes often sit between $80 and $150, and complex hardware repairs or data recovery can range from $200 to $600+, depending on the fault and parts required, according to Melbourne computer repair pricing published by 1300 Nerd Core.
That sort of range helps you make a sensible choice. If the fix is likely to be simple, a visit can save hours of frustration. If the machine has major board damage, you can make a calm repair-versus-replace decision with real advice instead of guesswork.
For residents in Bayside, Port Phillip, and Kingston, the ideal repair service is one that comes to you, explains the issue plainly, and doesn’t push a replacement when a repair will do.
If you’d rather skip the trial and error, Computer Daddy offers friendly on-site help across South East Melbourne, with practical support for home users, seniors, students, and small businesses. If your computer won’t turn on, they can check the power source, diagnose the underlying fault, protect your data where possible, and get you back up and running without the stress of guessing.